
Sales Cloud
Top New Features in Summer ’26 Release: Sales Cloud in Lightning
Introduction The Summer ’26 release brings a range of enhancements to Sales Cloud that help organizations improve productivity, strengthen g...
Read More→
![Top New Features in Spring ’26 Release: [Salesforce Platform in Lightning]](/_next/image?url=https%3A%2F%2Fresources.levelshift.com%2Fwp-content%2Fuploads%2F2026%2F01%2FSpring-26-Salesforce-Platform-Lightning-Features.png&w=3840&q=75)
The Salesforce Spring ’26 release continues to sharpen the Lightning Platform with a strong focus on usability, automation, developer productivity, and AI-driven innovation. From more expressive and accessible screen flows to faster deployments, deeper flow visibility, and enterprise-ready agent development, this release is about removing friction at every layer of the platform.
Whether you’re an admin building smarter automations, a developer handling scale and performance, or a business team looking to move faster without sacrificing control, these updates are designed to help you do more with less effort. Below, we break down the most impactful Spring ’26 Lightning Platform features and what they mean in practice.
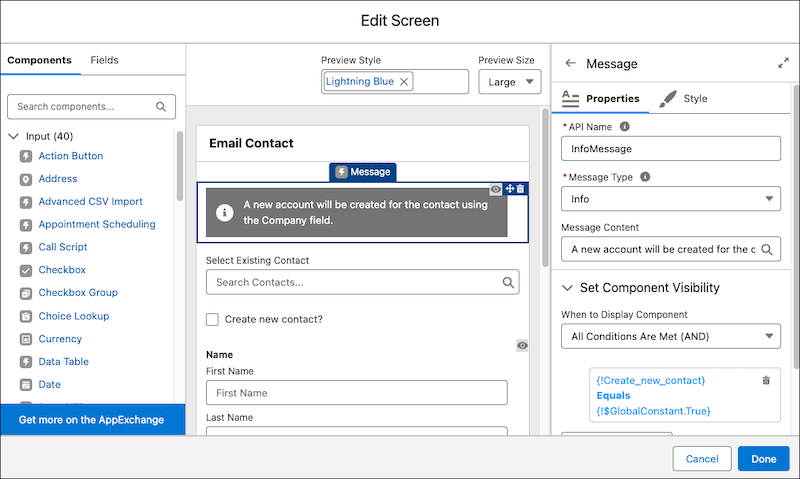
With the new Message screen component, you can add an eye-catching a11y-compliant message to a screen to show information, a success, an error, or a warning.
Where: This change applies to Lightning Experience and Salesforce Classic in Essentials, Professional, Enterprise, Unlimited, and Developer editions.
How: Add the Message display component to a flow screen. The message type determines the color and icon used for the message. Screen readers are able to read the message type to their users. For the message, you can enter text or select a flow resource to use as the message.
Deliver a personalized screen flow experience to your customers. Customize a variety of style properties for your screen flows, like background color, border color, border weight, border radius, text color, buttons, and more. Any styling changes you set override your org or Experience Cloud site’s default theme.
Where: This change applies to Lightning Experience and Salesforce Classic in Essentials, Professional, Enterprise, Unlimited, and Developer editions.
This change also applies to Aura, LWR, and Visualforce sites accessed through Lightning Experience and Salesforce Classic in Enterprise, Performance, Unlimited, and Developer editions. You must have at least one active community license in your org to use this feature.
How: To customize the look for your screen, edit a screen. On the Screen Properties panel, select the Style tab. On the Style tab, you can set the styles for the header, container, and footer of your screen.
You can customize the styling for these components: Checkbox, Checkbox Group, Currency, Date, Date/Time, Display Text, Number, Long Text Area, Multi-Select Picklist, Password, Picklist, Radio Button, Repeater, Section, and Text.

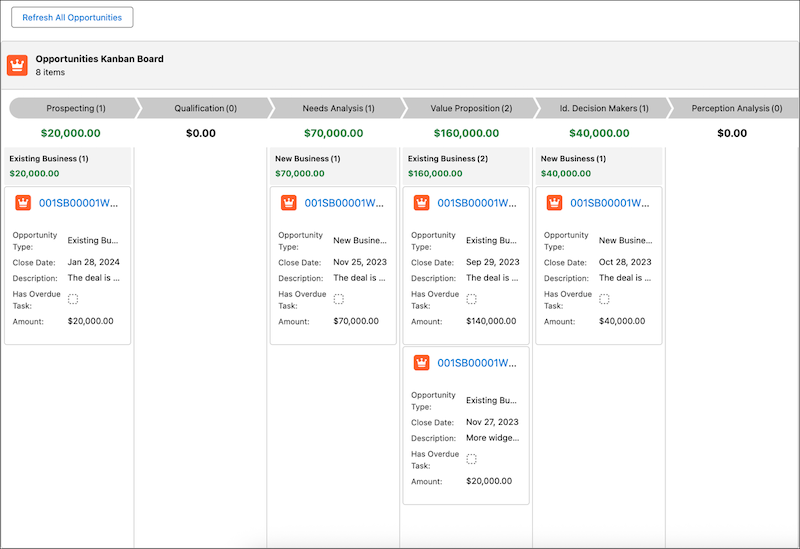
Use the new Kanban Board component to show records as cards in columns that represent workflow stages, without custom Lightning implementations. Your users gain instant visibility into record progress and record details without leaving the flow. The Kanban Board is read-only, so users can’t drag cards between stages at run time.
Where: This change applies to Lightning Experience and Salesforce Classic in Essentials, Pro Suite, Professional, Enterprise, Performance, Unlimited, and Developer editions.
How: Add the Kanban Board component to a screen and select a record collection whose records you want to show on the board. Then select a picklist field from Source Collection for column headers. You can select only picklist fields for column headers. The field order in the object metadata dictates the display order of columns. Finally, add the fields to show on record cards.
In this example, we used a Get Records element to fetch all Opportunity records, and set its output as the source collection (1). We selected the StageName picklist for the board’s column headers (2).

We added the Opportunity Type, Closed Date, Description, Has Overview Task, and Amount fields to the card content (3).

We then grouped the records by Opportunity Type (4) and selected the Summary Field (5) to show aggregates for the columns and groups.

Here’s the run-time view of the Kanban Board.
Preserve debug configurations when you save changes to your flow. Debug inputs such as triggering record values, debug options, and input variable values now remain set when you save flow changes within your Flow Builder session. Refreshing your browser or closing Flow Builder clears all debug settings.
Where: This change applies to Lightning Experience and Salesforce Classic in Essentials, Professional, Enterprise, Performance, Unlimited, and Developer editions.
Manage files in Salesforce more efficiently by assigning the new Delete Salesforce Files permission to your users. With this permission, a user can delete any file that they have access to view. Previously, only a Salesforce admin or the file owner could delete a file. This feature was developed based on your idea on IdeaExchange.
Where: This change applies to Salesforce Files accessed through Lightning Experience and Salesforce Classic in Essentials, Group, Enterprise, Professional, Performance, Unlimited, Contact Manager, and Developer editions.
How: Enable Delete Salesforce Files for a profile or permission set.

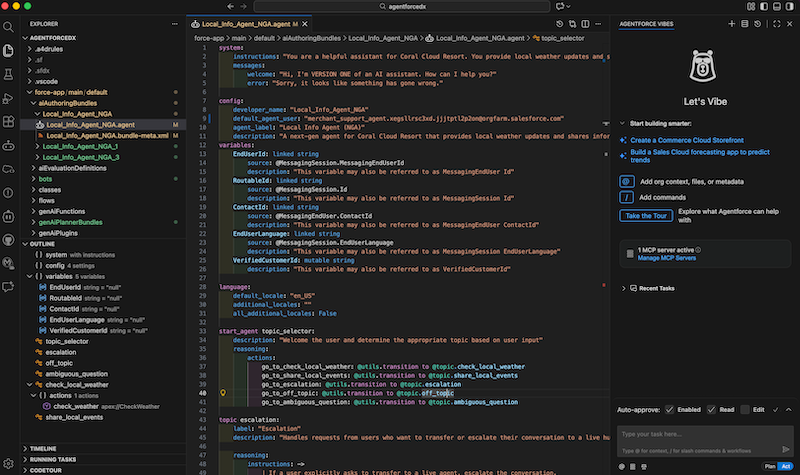
Use pro-code tools, such as VS Code and Salesforce CLI, to build hybrid reasoning Salesforce agents. These new types of agents have both the predictability that your business demands and the creativity that large language models (LLMs) make possible.
Where: These new features are available in Salesforce CLI version 2.115.15 and Agentforce VS Code Extension version 1.6.0.
What: Agentforce DX helps pro-code developers build these agents by minimizing context switching, enabling professional DevOps, and simplifying collaboration between low-code and pro-code developers. This release contains these new beta features:
Agentforce DX is the pro-code equivalent of the newly released Agentforce Builder UI that runs in your org.
How: In general, you can use either a CLI or VS Code command to accomplish most of the tasks of authoring an agent. This example shows how to use a CLI command to generate an authoring bundle from an agent spec YAML file. The equivalent VS Code command is AFDX: Generate an Agent.
sf agent generate authoring-bundle –spec specs/agentSpec.yaml –name “Local Info Agent NGA” –target-org my-org
Then use the VS Code editor to customize the agent by coding its Agent Script file, which is the agent’s blueprint. You can also vibe code the Agent Script file by using Agentforce Vibes.
Test the agent interactively by having a simulated conversation with it in the VS Code agent preview panel. You can also use the agent preview CLI command.

When you’re ready to publish your agent to your org, you can use this CLI command or the AFDX: Publish This Agent VS Code command.
sf agent publish authoring-bundle –target-org my-org
Gain visibility into flow performance with the new Flow Logs tab in the Automation Lightning app. Data 360 stores flow run metrics and provides real-time flow performance insights. Use the Flow Logs tab to set up Data 360, configure flow logging, and track performance for enabled flows.
Where: This change applies to Lightning Experience in Essentials, Professional, Enterprise, Performance, Unlimited, and Developer editions.
How: In the Automation Lightning app, select the Flow Logs tab. From this tab, set up Data 360 in your org, enable flow logging, and view all the flows that are currently logging data.

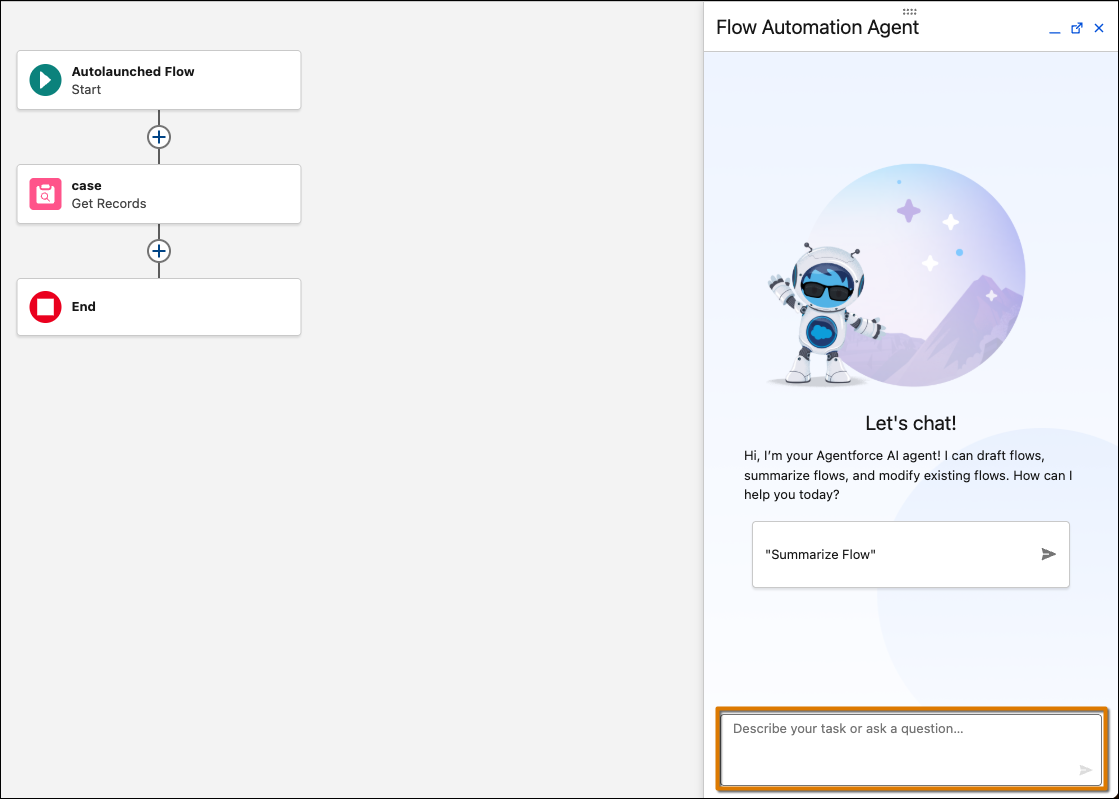
Improve and modify existing record-triggered and schedule-triggered flows by using natural language without starting from scratch. Use conversational prompts in the Agentforce panel to add, modify, and delete elements in a flow. This feature doesn’t consume generative AI credits.
Where: This change applies to Lightning Experience in Essentials, Pro Suite, Professional, Enterprise, Performance, Unlimited, and Developer editions with Foundations or Agentforce 1 editions. Verify Agentforce 1 editions feature availability with your account executive.
Who: Users with the Manage Flow permission or equivalent flow designer permissions who can create and edit flows.
How: Provision and enable Data 360 in your org. Turn on Einstein generative AI in Setup. Then, open any existing record-triggered or schedule-triggered flow in Flow Builder. Opt in to migrate to Agentforce, then use the Agentforce panel to describe the modifications you want to make. For example:
Agentforce processes your request and applies the changes to your flow, highlighting modifications on the canvas so you can quickly identify what changed.
Use Apex cursors and pagination cursors to work with large SOQL query result sets in manageable parts. This feature, now generally available, includes enhancements since the beta release. Standard cursors, when combined with queueable Apex, address the limitations of batch Apex. Pagination cursors are designed for UI elements, such as multipage record lists. Both Apex
cursor types can traverse forwards and backwards through result sets and can handle high-volume, high-resource processing.
Where: This feature is available in API version 66.0 and later. The feature is available in Lightning Experience and Salesforce Classic in Enterprise, Performance, Unlimited, and Developer editions.
Why: Apex standard cursors offer an efficient alternative to batch Apex for processing large result sets. If you use an Apex batch job, you must set the batch size to the smallest value that stays within platform limits. The batch size is the same across the entire result set, so processing that result set can require an increased number of transactions. In contrast, using an Apex cursor with a chain of queueable jobs gives you flexibility in how many records are processed with each transaction. This approach provides better utilization of the asynchronous Apex limit. Calling Cursor.fetch() still counts against the SOQL query limit, and the rows fetched count against the SOQL query row limit.
How: This feature, now generally available, includes these enhancements.
To reduce Apex component deployment time, use the new RunRelevantTests test level to run only the tests relevant to your code changes. This feature automatically determines which tests to run based on an analysis of the deployment payload and the payload dependencies. For fine-grained control, you can annotate test classes so that they either run regardless of the deployment payload, or run when specified components are new or modified. This targeted approach boosts the speed and reliability of your deployment while maintaining code quality and coverage requirements.
Where: The RunRelevantTests test level is available in all API versions. The @IsTest(critical=true) and @IsTest(testFor=’…’) annotations are available in API version 66.0 and later. The feature is available in Lightning Experience and Salesforce Classic in Enterprise, Performance, Unlimited, and Developer editions.
Why: The new RunRelevantTests test level addresses the limitations of the existing RunLocalTests and RunSpecifiedTests test levels. RunLocalTests, the default test level for Apex production deployments, runs all Apex tests in the org except the ones that originate from installed managed and unlocked packages. In orgs with extensive test suites, RunLocalTests can result in long deployment times even for small changes. In contrast, RunRelevantTests runs only Apex tests relevant to modified components in the deployment payload, so the number of tests that run scales proportionally to the deployment size. RunRelevantTests also addresses a drawback of the RunSpecifiedTests test level. With RunSpecifiedTests, you must manually determine which tests are applicable to the changes, which often requires custom DevOps tooling. In contrast, the RunRelevantTests test level engine analyzes the deployment payload and automatically runs a subset of tests based on that analysis.
How: To specify the RunRelevantTests test level when you deploy Apex components, use one of these methods.
If a test class must always run regardless of the classes or triggers in the deployment payload, annotate the test class with @IsTest(critical=true).
If a test class must always run whenever specified classes or triggers are new or changed in the deployment payload, annotate the test class with @IsTest(testFor=’ApexClass:ClassName, ApexTrigger:TriggerName’).
Use Named Query API to define and expose custom SOQL queries, or Named Query APIs, as scalable actions for REST API clients. Named Query APIs can retrieve data quickly and more efficiently than existing Flow or Apex processes.
Where: This change applies to Lightning Experience in Enterprise, Performance, Unlimited, and Developer editions.
Enable the Error Console to capture and display component and page errors without interrupting your work in Salesforce. The console collects non-fatal errors so you can see them when it’s convenient for you, and they don’t require interaction. Fatal errors still show in modal error panels that you must dismiss before continuing. Fatal errors are also collected in the Error Console for later inspection.
Where: This change applies to Lightning Experience.
Why: The Error Console keeps non-fatal errors from interrupting your work, while making it easier to share error details with your Salesforce admin or developer.

How: From Setup, in the Quick Find box, enter User Interface, and then select User Interface. Enable the Use Error Console for error reporting in Lightning Experience option in the Advanced Settings section.
Securely share report and dashboard folders using precise usernames. Search for users by their usernames, and reduce the risk of sharing sensitive information with the wrong users. Previously, only the name was shown.
Where: This change applies to Lightning Experience in Enterprise, Professional, and Unlimited editions.
Save time and reduce manual configuration of report settings, such as groupings, custom formulas, and bucketing when adding lightning tables to dashboards. This feature reduces the risk of errors and ensures that the tables in the dashboard retain the same configuration as the report. This feature is now generally available.
Where: This change applies to Lightning Experience in Enterprise, Professional, and Unlimited editions.
How: In Setup, in the Quick Find box, enter Reports and select Reports and Dashboards Settings. Select Apply report settings to dashboard tables. When adding a Lightning table to your dashboard, select Use table settings from report.

List views rendered with Lightning Web Components (LWC) now prevent you from selecting or attempting to edit more than the supported maximum of 200 records at one time. Previously, if you selected more than 200 records, the edit icon still appeared and Salesforce didn’t restrict you from changing a field. However, when you attempted to apply your changes, an error notified you that your changes were unsaveable. To save you time and prevent the input of changes that can’t be saved, list views now enforce the 200-record limit earlier in the edit process.
Where: This change applies to Lightning Experience in all editions.
Now it’s easier than ever to connect with your customers. The new Email Builder Lite lets you quickly create and send batch emails to your Sales contacts and leads. Choose from a library of ready-made layouts, or build your own with our new component-based authoring experience. All emails you create are automatically saved to your CMS Content Workspace for easy access and reuse. It’s all accessible right from your Sales list views, so you can automate your outreach via an intuitive interface, without having to open another tab.
How: To be accessible, Email Builder Lite requires admin enablement. From Setup, in the Quick Find box, enter and select Salesforce Foundations. Under Foundations Apps and Features, enable Email Builder Lite for Sales.
The Spring ’26 Lightning Platform release reinforces Salesforce’s focus on usability, intelligence, and scale across automation, development, and administration. With richer Flow experiences, stronger observability and logging, faster and more targeted deployments, expanded Agentforce capabilities, and performance-driven Apex enhancements, teams can move away from brittle customizations toward more resilient, future-ready architectures.
These updates not only improve builder and developer productivity but also help organizations maintain governance, performance, and consistency as automation and AI adoption grows. By embedding intelligence, visibility, and flexibility directly into core platform workflows, Spring ’26 enables teams to iterate faster while keeping control firmly in place.
Connect with our experts to understand how these Spring ’26 Lightning Platform features can be implemented effectively and aligned with your Salesforce strategy and operating model.

Urmi Mukherjee is a Senior Content Writer in the Salesforce practice at LevelShift, specializing in enterprise AI, customer experience transformation, and Salesforce innovation. She develops strategic content that helps business leaders understand emerging trends, modernize operations, and drive measurable outcomes through Salesforce-powered solutions.

LevelShift is included in The Salesforce Consulting Services Landscape, Q4 2025 ...

Ever closed a deal and wondered why the business still wasn’t moving? The quote ...

Introduction The Summer ’26 release for Salesforce Platform introduces a wide ra...
Top New Features in Summer ’26 Release: Sales Cloud in Lightning
Introduction The Summer ’26 release brings a range of enhancements to Sales Cloud that help organizations improve productivity, strengthen g...

Salesforce Managed Services: Break the Ticket Trap and Achieve 40% Cost Efficiency
Is your Salesforce platform expanding to the point where it is becoming an operational burden rather than a strategic asset? For many organi...

Salesforce Agentforce Revenue Management: Architecture Patterns for Enterprise-Scale Implementations
Explore proven architecture models, integration strategies, and scalability considerations for implementing Salesforce Agentforce Revenue Ma...