
Agentforce
Salesforce Headless 360 Explained: What It Is, Why It Matters, and How to Prepare
There’s a lot of buzz in the Salesforce world right now, and honestly, it’s deserved. At TrailblazerDX 2026, Salesforce dropped something th...
Read More→

The Summer ’26 release for Salesforce Platform introduces a wide range of enhancements aimed at improving accessibility, developer productivity, automation, security, and data management. From accessibility updates that support WCAG 2.2 compliance to new AI-powered capabilities in Flow Builder, this release helps organizations build more inclusive, efficient, and scalable Salesforce experiences. Developers can benefit from streamlined coding features, enhanced Lightning Web Component tooling, and stronger security controls, while administrators gain new tools to simplify automation, troubleshoot data processes, and improve operational performance. Whether you’re focused on application development, workflow optimization, or platform governance, the Summer ’26 release delivers meaningful updates designed to help teams work smarter and innovate faster.
To help meet Web Content Accessibility Guidelines (WCAG) 2.2 for Resize and Reflow, enable Lightning Experience to adapt the behavior of date pickers, popovers, bottom utility bars, and record headers when viewed at high magnification. This release update is dependent on the Enable Accessibility Enhancements for Page Headers and Modal Windows When Zoom Is Greater Than 200% release update. Make sure to enable that update first. This update was first available in Winter ’26 and was scheduled to be enforced in Summer ’26, but we postponed the enforcement date to Winter ’27.
Where: This change applies to Lightning Experience in all editions.
Why: With this update, content displays correctly in date pickers, popovers, bottom utility bars, and record headers for users who view Salesforce via a browser at 200% magnification or greater.
Without this update, these parts of the Salesforce UI aren’t compliant with WCAG 2.2 guidelines for Resize and Reflow. Content potentially displays only partially.
These changes help you support users with visual impairments.
Date pickers are accessible and usable at 1280px page width and 400% magnification.

Popovers are accessible and usable at 1280px page width and 400% magnification.
Record list view headers are accessible and usable at 1280px page width and 400% magnification.

Bottom utility bars truncate button labels to fit within the height of the utility bar. The full text of a truncated button label appears in a tooltip if you hover a mouse over a button or place keyboard focus on it.
How: To review this update, from Setup, in the Quick Find box, enter Release Updates, and then select Release Updates. For Enable Accessibility Enhancements for Date Pickers, Popovers, Bottom Utility Bars, Record Headers, follow the testing and activation steps.
To help meet Web Content Accessibility Guidelines (WCAG) 2.2 for Resize and Reflow, enable Lightning Experience to adapt the behavior of cards, docked containers, menu lists, and panels when viewed at high magnification. This release update is dependent on the Enable Accessibility Enhancements for Page Headers and Modal Windows When Zoom Is Greater Than 200% release update. Make sure to enable that update first.
Where: This change applies to Lightning Experience in all editions.
How: To review this update, from Setup, in the Quick Find box, enter Release Updates, and then select Release Updates. For Enable Accessibility Enhancements for Cards, Docked Containers, Menu Lists, and Panels, follow the testing and activation steps.
Use Single Component Live Preview to run a real-time preview of a Lightning web component in your browser. This feature, which is now generally available, includes some changes since the beta release.
Where: This change applies to Lightning Experience in all editions.
How: This feature was previously called Local Dev for single components. For more information about how Local Dev feature names have changed, see Local Dev is Now Salesforce Live Preview.
Also, the Salesforce CLI now automatically installs the Live Preview plug-in for you, so you no longer need to install it manually. If you try to run Live Preview commands without first enabling the feature, the CLI now prompts you to turn it on inside your IDE.
To run a real-time preview of a Lightning web component directly inside Visual Studio Code (VS Code) or Code Builder, use the Live Preview VS Code extension. This extension is now generally available for Lightning web components.
Where: This change applies to Lightning Experience in all editions.
How: This feature, previously known as Lightning Preview, is now called the Live Preview Visual Studio Code extension.
Let flow authors customize Lightning web components (LWC) by adding styling hooks to your code. The hooks define which properties an author can adjust in Flow Builder, such as colors and dimensions to match branding needs.
How: In your component’s .js-meta.xml file, add a tag as a child of the tag. Specify the hook name, label, and type. For components with lots of styling options, use the tag to organize the options into intuitive groups or tabs within the Flow Builder interface.
<targetConfig targets=”lightning__FlowScreen”>
<stylingHook name=”–slds-c-button-radius-border” label=”Border Radius” type=”dimension”/>
<stylingHook name=”–slds-c-button-sizing-border” label=”Border Weight” type=”dimension”/>
<stylingHookGroup name=”default” label=”Default” displayInTab=”true”>
<stylingHook name=”–slds-c-button-neutral-color-background” label=”Background Color” type=”color”/>
<stylingHook name=”–slds-c-button-text-color” label=”Text Color” type=”color”/>
<stylingHook name=”–slds-c-button-neutral-color-border” label=”Border Color” type=”color”/>
</stylingHookGroup>
</targetConfig>
Iterate quickly on user-facing screen flows and reduce the risk of manual configuration errors. Previously, you could use AI to modify record-triggered, schedule-triggered, external system change-triggered flows, and flows that use connectors as actions. Now, use generative AI to modify your existing screen flows by describing the changes with natural language prompts in the Agentforce panel. Add, remove, or change screen and action elements without manually adjusting logic in Flow Builder.
Where: This change applies to Lightning Experience in Essentials, Pro Suite, Professional, Enterprise, Performance, Unlimited, and Developer editions with Foundations or Agentforce 1 editions. Verify Agentforce 1 editions feature availability with your account executive.
How: To use the Agentforce panel for the first time, provision and turn on Data 360, and then turn on Einstein generative AI. From Setup, go to the Process Automation Settings page and select Agentforce flow automation (Beta). Next, open any flow, click, and then click Migrate to Agentforce.
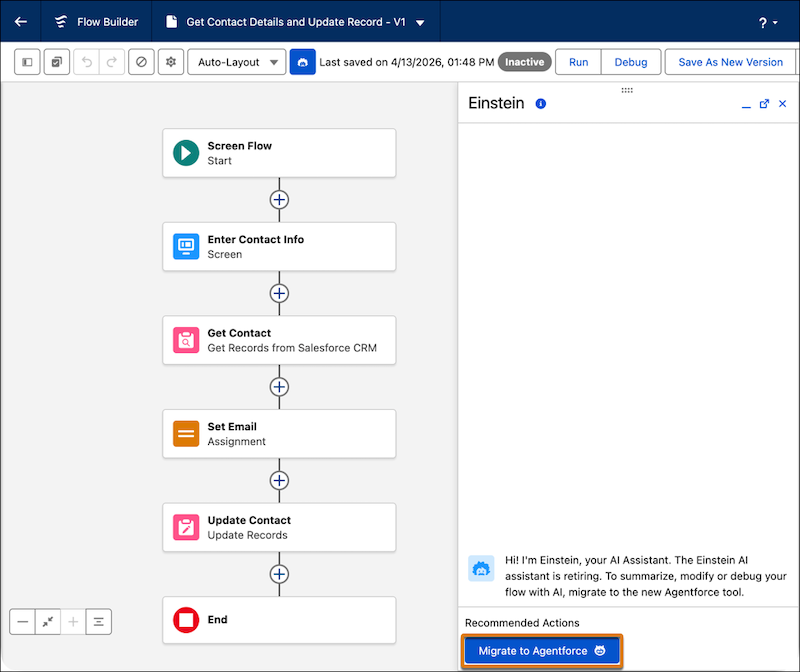
If you previously used the Agentforce panel, open a preexisting screen flow, open the panel, and describe the modifications you want to make. To prevent manual conflicts, the flow locks while Agentforce generates the changes. If the changes don’t meet your requirements, revert the most recent modification.
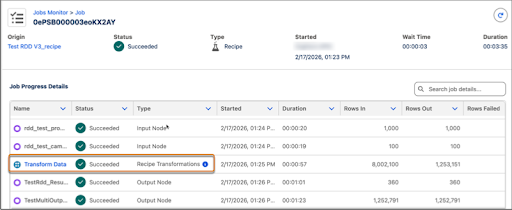
Use the recipe inspector to troubleshoot issues and improve performance. Deep-dive into your recipe jobs to view the detailed information at each stage of the flow. Monitor individual node performance and status. You can quickly identify a slow join or a transformation node that failed to make fixes immediately.
Where: This change applies to Salesforce Data Pipelines in Lightning Experience and Salesforce Classic. Salesforce Data Pipelines is available for an extra cost in Enterprise, Performance, and Unlimited editions.
How: In Data Manager, click Jobs Monitor. Select a job to view the Job Progress details. To inspect the recipe transformations, click Transform Data.
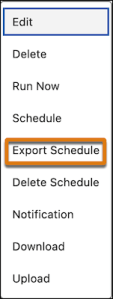
Export your Salesforce Data Pipelines recipe schedules as a calendar format (ICS) for quick reference and visibility in your calendar. For instance, share a recipe’s run schedule with stakeholders in other teams to coordinate data readiness and reporting deadlines.
Where: This change applies to Salesforce Data Pipelines in Lightning Experience and Salesforce Classic. Salesforce Data Pipelines is available for an extra cost in Enterprise, Performance, and Unlimited editions.
How: From Setup, in the Quick Find box, enter Analytics, and then select Settings. Select Allow users to export recipe schedules and then save your changes.
In Data Manager, on the Recipes tab, select a scheduled recipe and click the Export Schedule action in the dropdown menu.
Take advantage of an enhanced Apex security model that protects your data through default object- and field-level access enforcement. Apex database operations, such as SOSL and SOQL queries, DML statements, and Database methods, now run in user mode by default. In user mode, database operations enforce the sharing rules, field-level security, and object permissions of the current user. In earlier API versions, database operations default to system mode, which means that the current user can access all data regardless of their permissions.
Where: This versioned change applies to API version 67.0 and later. The change applies to Lightning Experience and Salesforce Classic in Enterprise, Performance, Unlimited, and Developer editions.
How: To determine the access mode of a database operation regardless of the API version, we recommend that you always set an access mode explicitly.
To set the access mode for a SOSL or SOQL query, use the WITH USER_MODE or WITH SYSTEM_MODE clauses.
Account acc = [SELECT Id FROM Account WHERE Name = ‘Singha’ WITH USER_MODE LIMIT 1];
To set the access mode for a DML operation, use the as user or as system keywords.
Account a = [SELECT Id, Name
FROM Account
WHERE Support__c = ‘Premier’
WITH USER_MODE];
a.Rating = ‘Hot’;
update as user a;
To set the access mode for a Database or Search method, set the accessLevel parameter to AccessLevel.USER_MODE or AccessLevel.SYSTEM_MODE.
Account a = Database.query(‘SELECT Id, Name
FROM Account
WHERE Rating = \’Hot\”, AccessLevel.USER_MODE);
Declare Apex strings that span multiple lines without using repeated string concatenation. To interpolate values into regular and multiline strings, use the new String.template() instance method instead of the existing String.format() static method. These features make your Apex code easier to write, read, and maintain, especially when you construct HTTP payloads and other large text blocks.
Where: This feature is available in all API versions. This feature applies to Lightning Experience and Salesforce Classic in Enterprise, Performance, Unlimited, and Developer editions.
Why: Unlike String.format(), which relies on index-based placeholders, String.template() uses named variable placeholders with the ${variableName} syntax. You can map values directly to descriptive keys, which eliminates the need to track array indices and makes your code easier to audit and maintain.
How: To create a multiline string, surround a text block with three single quotes (”’). After the opening quotes, start the main text on a new line. Place the closing quotes either directly after the main text or on a new line.
String newCustomerJson = ”’
{
“Name” : “John Doe”,
“Type” : “New Customer”,
“Interests”:
[
{“id”: “101”, “sportName: “biking”},
{“id”: “102”, “sportName: “running”},
{“id”: “103”, “sportName: “football”}
]
}”’;
To perform string interpolation, declare a string with named variables in the format ${variableName}. Then call String.template(Map<String, Object> valueMap) on the string. Pass a map where the keys are the variables defined in the string, and the values are the corresponding substitutions for those variables.
String formatted = ”’
{
“Account”: “${accountName}”,
“Last Updated”: “${date}”
}”’.template(new Map<String, Object> {
‘accountName’ => ‘My Account’,
‘date’ => DateTime.newInstance(2018, 11, 15)
});
Assert.areEqual(”’
{
“Account”: “My Account”,
“Last Updated”: “2018-11-15 08:00:00″
}”’, formatted);
Developers can now build and assign custom property editors (CPE) to individual input parameters rather than entire Apex actions. A Lightning web component (LWC) can control a single input parameter or manage multiple related parameters. Input parameters without CPEs continue to use the standard property editor in Flow Builder. This approach gives developers fine-grained control over parameter configuration with less complexity.
Where: This change applies to Lightning Experience and Salesforce Classic. It’s available in Enterprise, Performance, Unlimited, and Developer editions.
How: Developers create an LWC and reference it in an InvocableActionExtension metadata file for an Apex action input parameter. Developers can create multiple CPEs for different parameters in the same action, but each parameter can belong to only one CPE.
For example, an Apex action called MyAction includes two related input parameters: assigneeType and assignee. Developers create the myCustomEditor LWC to show the related parameters together. First, they use the CpeName attribute to assign the myCustomEditor LWC to the primary input parameter, assigneeType:
ActionParameter
MyAction.assigneeType
CpeName
String
c:myCustomEditor
Then, they use the ConfiguredBy attribute to add the assignee as a dependent input parameter to the same CPE:
ActionParameter
MyAction.assignee
ConfiguredBy
String
assigneeType
Now, when an action element in a flow references MyAction, its property panel uses myCustomEditor to manage the assigneeType and assignee input parameters. Other input parameters use the standard property editor. To control the vertical display sequence of input parameters in the action’s property panel, developers use the Order attribute. When a CPE controls multiple input parameters, the primary input parameter’s Order attribute determines where the CPE appears in the vertical sequence.
Create date-based branching with date operators in Decision elements. Select operators such as Is Today, Is Anniversary of Today, and Last Number of Days when a condition uses a date data type. This update helps you model recency and milestone logic without formula workarounds.
Where: This change applies to Lightning Experience and Salesforce Classic, for all flow types. It’s available in Essentials, Pro Suite, Professional, Enterprise, Performance, Unlimited, and Developer editions.
How: In a Decision element, add or edit a condition that uses a date data type, and select a date operator. Configure the resource, operator, and comparison details to match your outcome paths.
Deploy flows with Send Email actions between environments without broken email template references. Select an email template name from a dropdown list in the Send Email action. The action stores the selected template as a reference that persists across deployment environments. Previously, the Send Email action saved the selected email template as a template ID. Because the ID changes during flow deployment from one org to another, the action broke and required manual updates.
Where: This change applies to Lightning Experience and Salesforce Classic in Essentials, Pro Suite, Professional, Enterprise, Performance, Unlimited, and Developer editions.
How: To use a persistent reference, update your Send Email action to Action Version 3.0.1 and select an email template name.

Show record names instead of Salesforce IDs in Data Table lookup columns in screen flows that you add to Aura and LWR sites. For easier navigation, turn the record name into a link that opens the related record in a new browser tab.
Where: This change applies to Aura and LWR sites accessed through Lightning Experience and Salesforce Classic in Enterprise, Performance, Unlimited, and Developer editions.
Focus on building flows without constant validation interruptions. The validation panel now stays closed when you open a draft flow so that you can review errors and warnings only when you’re ready. The redesigned panel shows issues in organized cards grouped by element. Click a card title to open that element’s property panel and fix the issue. Consistent validation patterns across all elements make handling errors more predictable in Flow Builder.
Where: This change applies to Lightning Experience and Salesforce Classic in Essentials, Professional, Enterprise, Performance, Unlimited, and Developer editions.
Simplify your flow and focus on the working path by hiding fault paths. Expand the fault paths only when you’re ready to edit or review them. Your browser shows your personal layout state, so your canvas view is unique to you.
Where: This change applies to Lightning Experience and Salesforce Classic in Essentials, Professional, Enterprise, Performance, Unlimited, and Developer editions.
How: In the Auto-layout view in Flow Builder, click the fault path to switch between the expanded and collapsed views.

Optimize the execution of your scheduled flows and avoid hitting governor limits by specifying a custom batch size. Partition flow interviews into smaller batches ranging from 1 to 200 directly from the flow’s start element. Previously, scheduled flows processed interviews in default batch sizes of 200, which can exhaust resources in complex automations.
Where: This change applies to Lightning Experience and Salesforce Classic in Essentials, Professional, Enterprise, Performance, Unlimited, and Developer editions. The scheduled flows must be using a runtime version of 63.0 or later.
How: To configure a custom batch size, open the flow, and then open the Start element to select an object. Under Advanced Options, enter the maximum batch size.
The Summer ’26 release strengthens the Salesforce Platform with practical enhancements across accessibility, automation, development, security, and data operations. New AI-driven flow capabilities, improved developer tools, enhanced Apex functionality, and more flexible automation features help reduce complexity while increasing efficiency. At the same time, accessibility improvements and stronger security defaults ensure organizations can deliver better user experiences while maintaining governance and compliance. By exploring and adopting these updates, businesses can maximize the value of their Salesforce investment and build a more agile, future-ready platform.

Introduction The Summer ’26 release brings a range of enhancements to Sales Clou...

Is your Salesforce platform expanding to the point where it is becoming an opera...

Explore proven architecture models, integration strategies, and scalability cons...
Salesforce Headless 360 Explained: What It Is, Why It Matters, and How to Prepare
There’s a lot of buzz in the Salesforce world right now, and honestly, it’s deserved. At TrailblazerDX 2026, Salesforce dropped something th...

Beyond Implementation: What Buyers Can Learn from Forrester’s Salesforce Consulting Services Landscape
How do you choose the right Salesforce partner today, when so many seem to offer the same things? Choosing a Salesforce partner has never ma...

Why Data Cloud? The Importance of Activation
Do you ever feel like your business is a gold mine of data, but you’re still digging with a plastic shovel? Every customer interaction—brows...