Introduction
The Summer ’26 release brings a range of enhancements to Sales Cloud that help organizations improve productivity, strengthen governance, and streamline sales operations. This release introduces updates across email management, pipeline visibility, forecasting, reporting, permissions administration, and Agentforce capabilities. With new tools designed to reduce manual effort and provide better insights, sales teams can focus more on building customer relationships while administrators gain greater control over platform management. Whether you’re looking to improve sales performance, simplify processes, or enhance user experiences, these new features offer valuable opportunities to get more from Sales Cloud.
1. Verify Your Email Domain Ownership
To avoid disruption in email sent from Salesforce, verify the domains that you own with a DomainKeys Identified Mail (DKIM) key or an authorized email domain. As part of our ongoing efforts to strengthen the security of our email services, email domain verification is now mandatory. Salesforce no longer delivers emails from unverified domains, even if the email address is verified.
Where: This change applies to Lightning Experience and Salesforce Classic in all editions except Salesforce Free Suite and Database.com. This change has no impact on trial orgs.
How: Verify each of your email-sending domains. Each domain and subdomain requires separate verification via an active DKIM key. If you can’t use a DKIM key, configure a verified entry in the Authorized Email Domains list in Setup.
To minimize disruption, enable a substitute email address for unverified domains. On the Deliverability page in Setup, select Use a substitute email address for unverified domains, and then save your changes. That setting is available when email domain verification is required in your org.
2. Keep Email Flowing for Users with Unverified Domains
Enable users whose email domains you can’t verify—such as users with public email addresses, consultants, and site users—to send email from Salesforce. With your substitute email address, the user’s display name remains unchanged, but the From address uses email@UniqueId.sfcustomeremail.com, where UniqueId is your org ID or Experience Cloud site ID. This option also applies to system-generated emails and emails sent via shared email accounts with an unverified domain.
Where: This change applies to Lightning Experience and Salesforce Classic in all editions except Salesforce Free Suite and Database.com. This change has no impact on trial orgs.
How: From Setup, in the Quick Find box, enter Deliverability, and then select Deliverability. Select Use a substitute email address for unverified domains, and then save your changes.

3. Notify Users About Unverified Email Domains
As part of the requirement for email domain verification, Salesforce sends email notifications to users whose email addresses use an unverified domain. Users receive a notification if emails that they recently sent from Salesforce weren’t delivered or if they can’t send email from Salesforce when email domain verification is enforced. To control whether Salesforce sends one of these emails when your org gets Summer ’26, update a Deliverability setting.
Where: This change applies to Lightning Experience, Salesforce Classic, and all versions of the mobile app in all editions except Salesforce Free Suite and Database.com. This change has no impact on trial orgs.
Why: Your internal users receive one of two notifications per sending event. Both emails instruct the user to contact their Salesforce admin.
Experience Cloud site users, Salesforce Site users, and organization-wide email addresses are excluded from these notifications. If “Use a substitute email address for unverified domains” is enabled on the Deliverability page in Setup, these email notifications aren’t sent.
• If the user’s email address or reply-to address uses an unverified domain that’s on the temporary allowlist, they receive this email.

• If the user recently sent an email from Salesforce that wasn’t delivered because of an unverified domain, they receive this email.

How: To enable users with unverified email domains to send email from Salesforce, use a substitute email domain. See Keep Email Flowing for Users with Unverified Domains.
To stop the second round of email notifications for users with an email address or reply-to address that uses an unverified domain that’s on the temporary allowlist, enable a deliverability setting. After the initial change is deployed to your org, from Setup, in the Quick Find box, enter Deliverability, and then select Deliverability. Then enable Turn off user emails for temporarily allowlisted email domains. That setting is only available when “Use a substitute email for unverified domains” is disabled.

4. Access Agentforce from Your Outlook Integration
Leverage the power of Agentforce directly from your Outlook integration to prepare for meetings, summarize records, and trigger custom actions.
Where: This change applies to Lightning Experience and Salesforce Classic in Essentials, Group, Professional, Enterprise, Performance, Unlimited, and Developer editions.
How: If Agentforce is enabled, it automatically appears in your Outlook integration. Click Agentforce to start using it.


5. Gauge Relationship Health Quickly in Pipeline Inspection
Give your sellers the ability to assess engagement levels without scrolling through the activity timeline. Pipeline Inspection now includes an Activity column with a heatmap that tracks inbound and outbound activities, such as voice calls, video calls, events, and emails, over a 30-day period.
Where: This change applies to Lightning Experience in Enterprise, Performance, Unlimited editions with Agentforce Sales.
How: To add the Activity column to the Pipeline Inspection view, click the Gear icon and select Select Fields to Display. From the Available Fields area, move Activity into the Visible Fields area and click Save.

After adding the column, sellers can hover over a segment to view activity summaries or drill into activity details in the side panel.

6. Differentiate Sales Goals with Currency and Quantity Targets
Gain flexibility in your planning process by defining whether goals are currency-based or quantity-based. Stylize targets to reflect specific metrics, such as revenue growth in your default currency or unit counts for new logos. This ensures your goals are presented clearly and accurately across all Sales Planning views.
How: Navigate to Plan Home to create or modify a goal. In the Manage Goals modal, toggle the Show metrics as currency option to automatically apply your Salesforce default currency settings. If left unselected, the goal defaults to a numeric quantity.
Seamlessly qualify Contacts and Person Accounts to build a stronger pipeline with Agentforce for Sales. This enhancement allows your agent to determine how strong of a fit a prospect is based on their conversation and how well they meet your Ideal Customer Profile (ICP). Qualification helps sales reps focus on high-potential deals, improving overall efficiency and conversion rates.
Where: This change applies to Lightning Experience in Enterprise, Performance, and Unlimited editions with Sales and Einstein for Sales. Setup for agents is available on the desktop site.
How: From Salesforce Go, go to the agent configuration for Inbound Lead Generation or Lead Nurturing, then navigate to the Qualification section and select the desired object(s).
8. Control Which Fields Receive Autonomous Updates
Specify the individual fields that the Sales Management agent can update on the seller’s behalf by modifying the Process Field Update Suggestions flow. Give your agent the ability to update certain fields on its own while it continues to generate suggestions for other fields.
Where: This change applies to Lightning Experience in Enterprise, Performance, and Unlimited editions with Foundations and the Agentforce for Sales or Agentforce for an Industry add-on license, or included in Agentforce 1 Sales or an Industry Edition. Requires each user to have the Agentforce for Sales or Agentforce for an Industry add-on to access the actions.
How: In the Process Field Update Suggestions flow, specify the fields that you want the agent to update in the Field API Names for Custom Autonomous Updates parameter on the Get or Execute Field Update Suggestion action element.
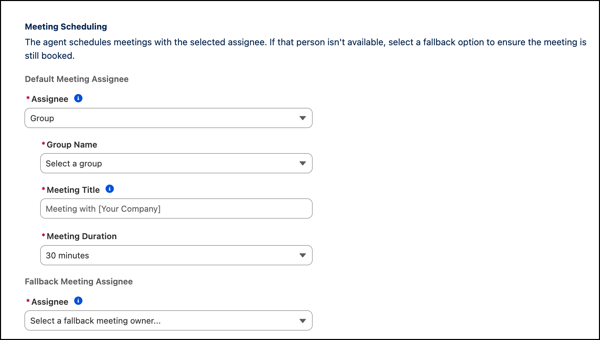
9. Boost Prospect Conversion with Group Calendar Availability
Make it easier for a prospect to schedule a meeting at a time that’s convenient for them by enabling group scheduling for the Lead Nurturing and Inbound Lead Generation agent. When scheduling a meeting, prospects view all of the available time slots of Inbox users with a connected email in the selected group.
Where: This change is available in Lightning Experience in Enterprise, Performance, and Unlimited editions with the Agentforce for Sales add-on. Agent setup is available only on the desktop site.
How: In the Meeting Scheduling section of the Lead Nurturing or Inbound Lead Generation agent configuration, set the Assignee type to Group. Select the group name that you want the agent to use when scheduling a meeting.
10. Ensure Consistent Branding Across Your Reports and Dashboards with Brand Color Palettes
Reduce manual effort and maintain standardized, accessible data visualizations across your organization by using a brand color palette. Instead of manually updating colors in individual reports and dashboards, you can configure a brand palette once in your organization’s theme settings and apply it to report and dashboard charts.
Where: This change applies to Lightning Experience in Professional, Enterprise, and Unlimited editions.
How: From Setup, in the Quick Find box, enter Themes and select Themes and Branding. Set the brand color by creating or editing a theme, and then activate the theme.
To apply the brand color to your reports, select Brand in the report chart properties.

To apply the brand color to your dashboard widgets, select Brand in the dashboard properties.

Save time on reporting and generate deeper insights by including up to two row-level formulas in your Salesforce reports. Calculate values directly in the report without adding formula fields on an object. For example, calculate both the commission rate and the time-to-close metric in a single report. Previously, reports supported only one row-level formula.
Where: This change applies to Lightning Experience in Professional, Enterprise, and Unlimited editions.
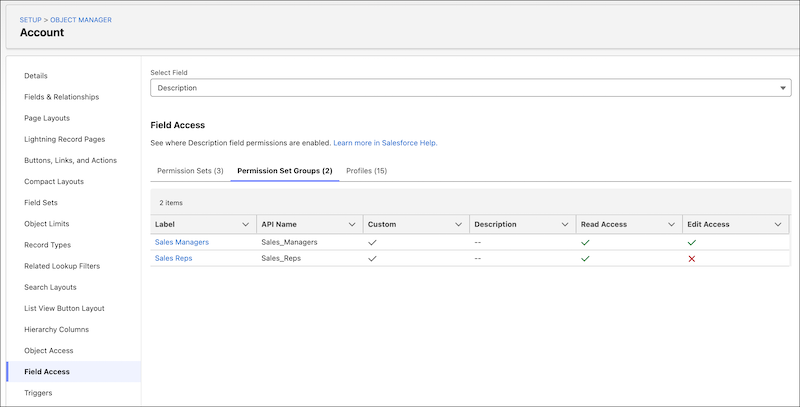
12. Review Field Access Across Profiles, Permission Sets, and Permission Set Groups
Save time by reviewing field-level security for a specific field in all profiles, permission sets, and permission set groups. Instead of going to individual Setup pages, you can view this information in one place in the Field Access Summary in Object Manager.
Where: This change applies to Lightning Experience in Professional, Enterprise, Performance, Unlimited, Developer, and Database.com editions.
How: In Setup, go to Object Manager, and then select an object. In the sidebar, select Field Access. Select a field to review how its access is configured.
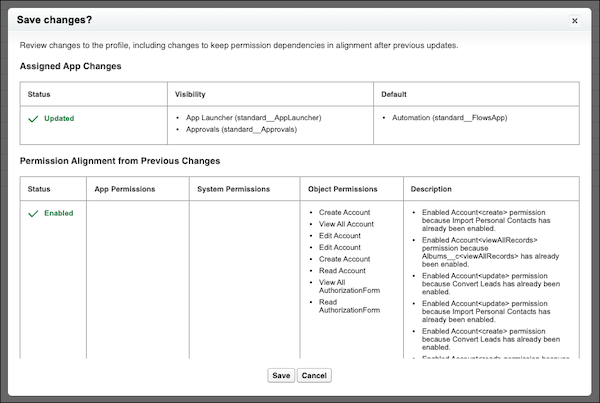
13. Track Permission Dependencies More Easily
When you update permissions or apps in the enhanced profile user interface, you see any additional changes required to keep dependent permissions in alignment after previous updates. Previously, these changes occurred in the background, but were visible only in the Setup Audit Trail.
Where: This change applies to Lightning Experience and Salesforce Classic in Essentials, Professional, Enterprise, Performance, Unlimited, Developer, and Database.com editions.
How: After you save changes to user permissions, object permissions, or assigned apps, review any additional permission changes.
14. Choose Whether to Grant Access Using Role Hierarchies for Queues
Use the new Grant Access Using Hierarchies setting to restrict record sharing to only specified queue members. Previously, records shared with a queue were always shared with the queue members’ superiors in the role hierarchy. This setting provides greater control over your users’ record access and prevents superiors from receiving unnecessary email notifications.
Where: This change applies to Lightning Experience and Salesforce Classic in Contact Manager, Group, Essentials, Professional, Enterprise, Performance, Unlimited, Developer, and Database.com editions.
How: From Setup, go to Queues. Create a queue or select an existing one. Select or deselect the Grant Access Using Hierarchies setting, and then save your changes.
The Grant Access Using Hierarchies setting is enabled by default in existing queues and disabled by default in new queues. To control the default value of this setting, select or deselect the org-level setting Grant access using hierarchies by default in new queues on the Sharing Settings page. This setting doesn’t affect existing queues, and you can still modify the individual Grant Access Using Hierarchies setting on queues.
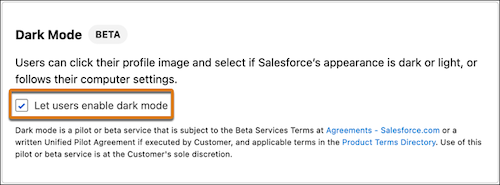
15. Use Dark Mode in More Editions and Features
Enable dark mode for Salesforce Lightning Design System 2 (SLDS 2) themes in Performance and Unlimited edition orgs. And in all editions where dark mode is available, you can now upload a dark-mode version of your company’s logo for SLDS 2 themes. Dark mode shows light-colored text and visual elements on a dark background, which lays the foundation for richer theming opportunities and more customization of Lightning base components. With dark mode enabled, your users can select an appearance that reduces eye strain in low-light conditions and enhances readability.
Where: These changes apply to Salesforce Lightning Design System 2 and Lightning Experience in Performance and Unlimited editions.
How: To enable dark mode, from Setup, in the Quick Find box, enter Themes and Branding and select it. Click New Theme, or click next to an existing SLDS 2 theme and then select Edit. In the Dark Mode section, select Let users enable dark mode.
Save your changes and then activate the theme.
After you enable dark mode, a user can click their profile image and select how they want Salesforce to appear.
Not all Salesforce apps and features are fully optimized for dark mode yet, including:
• Analytics, reports, and dashboards
• Builders
• Setup
16. Require Unanimous Approval for Approval Steps Assigned to Groups
Require all group members to approve their work items before an approval step can proceed. When you configure an approval step with unanimous approval, every member receives an approval work item. If any member rejects, the approval step is rejected. If all members approve, the approval step is approved.
Where: This change applies to Lightning Experience. It’s available in Enterprise, Performance, Unlimited, all Einstein 1, and Developer editions.
Why: Previously, an approval step assigned to a group was completed when the first member responded. To require input from multiple people, you created a separate approval step for each approver. Now, manage multi-stakeholder reviews and compliance requirements within a single step.
How: To require all group members’ approval, select Require unanimous approval when configuring the approval step.
When the approval step runs, the submission’s orchestration run creates an approval work item for each group member and sends personalized email notifications.
The Work Guide shows individual approval work items for each approver. Admins can view the parent work item that tracks overall progress for the approval step.
If a member rejects their work item, the submission’s orchestration run changes pending child work item statuses from Assigned to Withdrawn. The approval step is then rejected.
Conclusion
The Summer ’26 release delivers practical enhancements that support both sales representatives and administrators. From improved email deliverability controls and enhanced reporting flexibility to AI-powered Agentforce capabilities and streamlined permission management, these updates are designed to help teams work more efficiently and make informed decisions faster. By taking advantage of these new features, organizations can improve productivity, strengthen operational oversight, and create a more effective sales environment.